Showing posts with label recycle. Show all posts

Sunday, May 16, 2010

Planet Savers, Plant it Earth

Plant the whole world!
Isn't this just the cutest seed packet you've ever seen?

My step dad, Jim, gave this to me for Earth Day. It's handmade from recycled paper. Each little earth is embedded with seeds. Mine is forget-me-nots.

I'm going to plant the planet tomorrow. First you have to soak it in water. Then cover it with soil. As the seeds become flowers th fiber will break down in the soil.

I'm so excited by this cleaver recycle product from GP Green by design. That's why they're this weeks Planet Savers!

I love to see companies large and small making changes for a greener planet!


Monday, May 10, 2010

Inspiration & Imagination

I stumbled across this video recently & I wanted to share it with you too.  This is why we must continue to encourage imagination in our children!


Friday, May 07, 2010

Friday Finds: Repurposing Empty Prescriptions

Over on my facebook fan page,  Shannon T asked me if I had any craft project ideas to use empty prescription bottles.  I'm working on coming up with a tutorial for another way to use these for crafting, but in the meantime I found these ideas on the web. 

Before re-purposing your prescription bottles, remove the labels and wash them out.  You want to remove any of the medication residue that may be clinging to the plastic bottle.

If you'd rather recycle them, check out Jacob Willard's project


Make a "Hide a Key" from Make Online

Blessings Overflowing blog will show you how to make them into decorative first aid kits

Families Online has a rain gauge tutorial

Craftstylish shows you how to make a thread keeper/cutter with a repurposed pill bottle

Pepper Paints will show you how to make your own watercolor paints which she stores in film canisters, but you could use pill bottles.

Make some noise!  WonderHowTo.com has an instructional video using a pill bottle to create an airhorn.  Could be fun for those sporting events!


Turkey Call? Here's the how to from Field & Stream
and here's a video of one in use:


Thursday, April 29, 2010

Recycling DIY: How to make a May Day basket

May 1st, aka May Day is a fine way to celebrate springtime, friendship and neighborly love.

Ever since I was a young girl, I've looked forward to the arrival of May Day and the chance to bring a little surprise and sunshine to an unsuspecting recipient.

Now as an adult I've moved on from the construction paper creations of my youth, but I still like to be creative with my May baskets.

Today I'm going to teach you how you too can turn an old can, some sticks, wire,  a bit of ribbon from your stash and some pretty spring flowers into a little basket of joy to leave on a lucky neighbors door.


For this project you will need the following:
  • a hammer and nail
  • needlenose pliers
  • a thick piece of elastic (or several rubber bands)
  • about 3 feet of medium gauge wire
  • a can from your recycle bin
  • pruners
  • some sticks
  • about 2 feet of ribbon, string or leather strip
  • some pretty flowers and foliage
  • and about 1 1/2 hours of free time
 Step 1:  Using the nail and hammer punch 2 holes in the side of the can near the upper rim.  Try to space them evenly apart

 Step 2:  Cut a piece of your wire about 18" long.  This will form your handle and needs to be long enough to hang over a doorknob.  Run wire through the holes you made in Step 1.  Allow the wire end to poke through about 3".  Using the needle nose pliers, wind the wire around itself tightly.  Cut off any wire ends.


Step 3:  Remove the paper label from your can and place it in the recycle bin.  If you dont remove this, some of the label will show through the gaps in your stick basket.  


Step 4:  Using the pruners, cut your sticks to varying heights at least as tall as your can.  Use sticks from different types of trees for a variegated effect which adds visual interest, or use all the same type for a cohesive more refined look.  It's up to you. 


Step 5:  With your thick elastic or several rubber bands on your can, add the sticks until the entire can is covered.  Vary the height of the sticks for interest.  I like the way this is starting to look.


Step 6:  Leave the elastic in place and run some wire around the can over the sticks.  Use your needle nose pliers and twist until this is tight and secure.  Now remove the elastic.  Check around the can for any loose spots and add twigs to fill those. If you like, add some vine around your handle to camouflage the wire handle.

Step 7:  To cover the wire from view, use your piece of ribbon and wrap around the can several times.  I used a bit of leftover leather strapping on mine for a natural effect.  You may want to use bright ribbon, raffia or even yarn cover your wire.


Step 8:  Fill  your May Day basket with beautiful blooms! Don't forget to add some texture with different types of foliage too. Or for a garden buddy you may want to fill with starts from your garden.  


Step 9:  Hang your basket on a neighbors doorknob.  You could add a little card if you like, but my idea of May Day is to try to be anonymous.  I'm a little to slow now days for the "ring and run" of my child hood.  Instead I just wait for an opportunity and hang these up while my friends or neighbors are out.


Friday, April 23, 2010

Friday Finds

We're back with Friday Finds where I'm sharing fun, interesting and informative things I've found this week on the web.

Thread Banger has some of the best how to videos that I've found on the web!   Here's a great one for making a dress from Tshirts.  It's even got pockets!


Here's another re purpose T project for turning your old Ts into new halter tops.  Come on sunshine!:


Bicyclists, how about an upcycle wallet from one of your old innertubes?  Instructables will show you how!

Need a heavy duty bag.  Why not try upcycling some old jeans for this denim tote from Crafting a Green World

A quick n easy upcycle for plastic bags:  Make a fused plastic drink coaster from Cut Out And Keep

Oh I like this one!  Make some cushy spa slippers by upcycling an old pair of flip flops (We called those thongs when I growing up)  and an old bath towel  Crafty Nest will take you through each step!

Photo: Kayte Terry
This is one for you if your more mechanical.  You can make quite a beautiful lamp from a cd spindle.  (I'll have to see if I can convince Ben to help me with this project.


How about turning those colorful magazines that you've got stashed for a future project into useful and pretty boxes.  Abstract Octopus takes you through a step by step tutorial to make your own!

Are you a bibliophile?  Why not repurpose an interesting hardback book into a handbag.  Curbly shows you how:


Wow!  I'm absolutely fascinated by this.  Did you know could build a solar heater with aluminum cans and a few other items?  Me either, but I found this while surfing this week. If 10 year old, Rashel Cortez can do it, then it can't be too difficult!  Check this out.  Could be the answer for an outbuilding, green house or shed.  I'm thinking if my studio were heated with something like this I may even venture up there in the winter months.


Well that's all I've got for you today.  Enjoy these crafty and useful ways to get a second use from everyday items.  Drop me a line if you have some sites you'd like to share in a future Friday Finds post.  I'm looking for your DIY tutorials for green projects and upcycle crafts.  Just click on my photo below for email.
Thanks!


Sunday, April 11, 2010

This weeks Sunday Planet Saver is.......

I know I shouldn't blow my own horn, but I'm so pleased with my recycling efforts so what the heck?  Here goes.....................


TOOT!  TOOT!  

This is why I am so proud of myself today, here's my latest collection of FatBottomBags.  Most are available in the store if your interested.  A few are for a special order and a couple are gifts for friends with upcoming birthdays.

This photo contains over 620 recycled plastic bags!

 I think my running tally is now up to somewhere around 6500 plastic bags recycled! And that my friends, is why I'm blowing  my own horn on Sunday Planet Saver. 

Here's one for you too!
TOOT! TOOT!

Why for you? Because I couldn't do what I'm doing without you!  It's so exciting to see that together we are closing the loop with recycling.  So thank you to my contributors who have donated their plastic bags to me for recycling.  Thank you to my loyal and wonderful green customers for purchasing the finished bags.  Thank you friends, family and followers for encouraging me on this path.  Together we are making a difference!


Friday, March 26, 2010

Friday Finds

This week for Friday Finds I've been looking for things you can do with cans, both aluminum and tin cans.  Of course most municipalities have curbside pick up for cans, some states even have a deposit to return cans and bottles.  Recycling is a great option, but the 3 Rs are Reduce, Reuse and Recycle, so I always like to find interesting and fun ways to reuse items before they go into the recycle bin.


Here's a neat one from Little House in the Suburbs to make these leaf ornaments from aluminum cans.  There are more photos over on the site and they look beautiful adorning her holly bush


10th Muse Studios used the same concept to show us all how to make some cute pop can flower magnents at her blog


The new new blog has a great tutorial to use aluminum cans for pendants and jewlery. 


This one's not a tutorial, but it's a fabulous Haute Coutoure dress made from all kinds of recycled materials including cans, labels, bottles and bags.  I surely wouldn't want to wear it, but it's always neat to see this artistic visions done with recycled materials.  I wonder how much this dress weighs??


Susan Beal at Craft Stylish has shared her idea to recycle cans along with wire and beads to make pretty little hanging baskets for a spring birthday or garden party.  I love this idea your decorations are recycleable and reusable and living flowers!  Great idea Susan!


Remember May Day when you were a young girl?  I do!  I loved making those little paper baskets and filling them with whatever flowers were within my reach.  I wonder if those neighbors ever asked themselves how many of the flowers in my little May Day gift basket were harvested in their own yard?  :0)

Here's another use for a recycled can from Skip To My Lou.  You can do this one with your own children or grandchildren and pass the tradition of May Day on to a new generation, while teaching a valuable lesson in recycling and reuse too!


Lady Gaga actually wore hers out and about, but you can use cans as hair rollers to form big beautiful curls.


Martha Stewart has a really cute "robot dog" idea that you can make from tin cans.  He's even got little roller feet, so your little ones can take him for a walk!  Very very cute!


You can even make your own camp out cook stove with these video instructions!

I'm sure there are a lot more fun, useful and intersting ways to repurpose cans.  Do you have some good ideas or links for this type of project?  Share them with us in the comments!


Sunday, March 07, 2010

Sunday Planet Saver

It's easy to get overwhelmed when greening up our lives.  I mean there's so many habits to change and so much to learn about that at times it can seem like a lot of effort.  That's why I'm all about simple steps.  Just like any journey in life, it doesn't happen all at once it starts with a single step.  So for today's planet saver suggestion I'm appealing to your eco-sensibility to BYOM (bring your own mug)

My favorite Coffee Mug!

I don't know about you, but I don't even try to start my day without a fresh cup of coffee.  When I worked in the "real world" I often had 4 or 5 cups of coffee throughout the day just to stay productive. You know how much we love our coffee in the Pacific Northwest, home of Starbucks, Tully's, Seattle's Best and my favorite Fidalgo Bay Coffees!  Up here you can't throw a stone in the city without hitting an espresso stand! Even if you are just drinking 1 or 2 cups a day, or taking tea on your break, those disposable cups, lids and stir stix add up quickly in our landfills and most of those disposables are not recycle-able!

Think about it in these terms:  There are 365 days in each year with 260 weekdays, so if you work 5 days a week, each year you may be sending 260 plastic, paper or foam cups to the landfill along with plastic stir stix and lids.  That is a lot of unnecessary waste!  

Instead, why not bring your own mug (and spoon) to the office.  You can reuse it all day long without worry of the bottom giving out and at the end of the day just a quick rinse and it's ready for use again tomorrow.  Plus, with your own mug, you can express yourself!  I love that!  When I worked in corporate America I always tried to find a fun happy and colorful mug to express myself in the gray cubicle rat-maze where I spent 260 windowless days every year!  It was a little something that I could do to brighten my workspace up.

So tonight when you are getting your backpack, briefcase or purse ready for the week to come, take a second and add your favorite mug from your cupboard. It's a simple step with a huge impact!  It's easy being green when you take it a step at a time!

When we all do our small part, we really can change the big picture!

Thursday, March 04, 2010

Friday Finds

Friday Finds is an idea I had to bring you some of the fun, interesting and exciting things that I come across throughout the week while surfing the web.
This week I've been looking at a lot of sites with recycle crafts hoping to find some new uses for items that might otherwise wind up in the trash, so for this first installment of Friday Finds I thought I'd show you some recycle themed projects that I've found in my never ending web adventure.


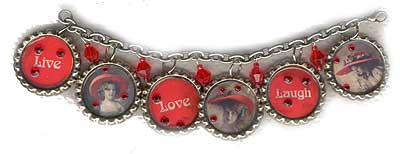
Here's a creative way to reuse / recycle bottle caps to make a cute charm bracelet like the one above.  Over at Go Make Something you can learn how!

 
How about something to make with those hard to recycle plastic bottle caps.  I found this pincushion tutorial over at My Little Mochi  


Are you a seamstress?  Do you refashion old items into new fashions?  Like me you may have looked at purchasing one of those *very* expensive dress forms and thought, wow, if only it wasn't so spendy!  Well Cut Out and Keep has a great solution to make your own CUSTOM dress form.  this is a 2 person project, so grab a crafty friend and make one for each of you.


The Storque Etsy's Handmade Blog shows us how to make this adorable little chipmunk toy by recycling a glove.  I'm thinking of trying a couple of these one for my granddaughter and another for my dog Echo the eco dog!


And we can't leave out one for the kitty cats.  Design Sponge has made an easy cardboard scratcher for her pretty kitty and you can make one too!


Ok this is my favorite one for making grocery bags so far!  Wisdom of the Moon teaches us to turn a repurposed sheet into enough reusable bags to bring home all of your groceries!  This one requires only very basic sewing skills, so no more excuses for plastic shopping bags!


Here's another craft you can do with those plastic bags you have collected in your kitchen. Lucky Ladybird Craft Blog instructs us all how we can repurpose them into baskets for decoration and storage


Thursday, February 18, 2010

Recycled bags need recycled tags

I've been wanting to have some garment tags made for my FatBottomBags, but after searching the internet for an option I found it is extremely expensive to have custom tags printed and it was impossible to find a recycled material option.  So after some struggle, I've found a way to make my own recycled tags to mark my bags as original FatBottomBags!

You might use this shrink plastic method to do a quick and fun recycled project with the kids *remember shrinkedinks*, or to create your own tags, beads, charms for a bracelet or necklace or even buttons for a sewing project!  


Here's what you'll need for this project:
  • Cookie sheet lined with paper
  • #6 plastic containers
  • Sharpies or other permanent markers
  • Scissors
  • Hole punch
  • Oven
Step 1:  Preheat your oven to 350 degrees

Step 2:  While oven is heating, begin to cut out shapes from your plastic container.  These will shrink significantly, so cut them about 3 - 4 times larger than you want your finished item sized. 

Step 3:  Using your regular hole punch, punch holes in the plastic.  For mine I put a hole on each end so I can sew the tags onto my FatBottomBags. 

Step 4:  Decorate with sharpies.  I just added the name FatBottomBags to mine. 

These large thin pieces will become smaller thick tags

Step 5:  Lay your decorated item on a lined cookie sheet.  I used regular paper to line mine.  Leave some space between each piece.

Step 6:  Once you've completed all of your designs and have your items on the cookie sheet, place in preheated oven for 2 to 3 minutes.  Be sure to run your vent fan to ventilate any fumes.  (I didn't notice any bad smell when doing this project)

Step 7:  Remove from oven.  Allow to cool on a flat surface.  Once your items are cooled they are ready.


Fast, fun and recycled!  I think these will look nice on my recycled FatBottomBags.  :0) 


Monday, February 01, 2010

Another recycle exchange for a hard to recycle item!

This weekend I kept myself busy with a new project for the FatBottomSTORE. I've decided to add some other items made from repurposed materials to go along with the usual bags and purses. You've seen them in my blog tutorials, and some of you will hopefully be making your own. For the non-crafters out there who still want to use recycled items in their homes, I'm offering some for sale.

To go along with this expansion of products, I'm starting another recycling exchange. Here's how it works: You send me 3 of those mesh produce bags for repurposing and I'll send you a set of recycled scrubbies by FatBottomBags.

These little scrubbies are great for dish washing
and/or cleaning your veggies

This is the set you will receive and you'll save 3  plastic 
bags and 1 plastic mesh bag from the wastestream too!
Colors may vary based on availability.
Just send your mesh bags, along with your address and email address to:
         
          FatBottomBags
          c/o Christi Spangler
          2843 Aiston Creek
          Lummi Island, WA 98262

Saturday, January 30, 2010

Saturday morning: Mom's coming and making mesh pot scrubbers

Hello and happy Saturday.  Today I'm rushing about trying to get the house cleaned up in preparation for a visit with my mom.  You know how that goes ladies?  Mom's coming, quick, get the chores done!  LOL!  Just like when I was a kid.  I guess some things never change

Today's recycling and living green post is one I did as a guest post over at Going Green Crafters and Artists.  Hop on over there and learn how to make your own pot scrubbers from recycled/repurposed plastic mesh produce bags.  It's easy and 1 mesh bag makes 1 pot scrubber!

Or if you are not the crafty sort, keep you eye on the FatBottomBags STORE.  I'll be selling these along with some other fun and useful recycled items in the near future to go along with my recycled bags!

Have a great weekend!

Tuesday, January 12, 2010

Break over and back to work

It was lovely to take a break from bags for a couple weeks.  That's the thing when you work for yourself, seems like you never take time off.  I know that's true for me.  But this year I decided it was important to give myself a break, a Christmas vacation of sorts.  It was nice, but now that we're into the second week of the new year I knew it was time to refocus on my crafting for a greener planet.

So if you are a new reader and don't know about my FatBottomBags,  they are all made from recycled plastic shopping bags that I collect from friends and family. My goal is to save as many of those rotten plastic bags from going into the waste stream as possible.  I cut them all up and sort them by color and then crochet them into one of a kind purses, backpacks and totebags.

Yesterday I spent a couple of hours sorting and cutting 500 newly contributed plastic bags.  Then I went on to start on some new bags and purses for the store.  I worked on a new purse all evening and finished it off this morning. So here's what I've been up to:


This is one of my totes.  They're a great size for reusable shopping bags


This cute little purse is the latest Bee bag I've made.

Ok, so now it's on to some more domestic chores like finish the laundry and grocery shopping! 


Have a great GREEN day!

Monday, January 04, 2010

Bee Green Greenwashing

So yesterday in my post Welcome to 2010 an Earth Odyssey I talked about simple ways to green up your life and our future.  One of those suggestions was to be aware of packaging when making purchases and that brings me to todays topic, Greenwashing.   Greenwashing is a term used to describe companies and products who are jumping on the ecomovement by trying to claim to be green, but on closer inspection are simply trying to fool us all.
This Christmas I received this wonderful and thoughtful gift from my mother.  She chose this for me because she knows how much I love houseplants and being green.  I love it, however it is a great example of a green wash.

I love to Bee Green!
So this company is selling an idea of being green, but check out the next photo and you'll see that they aren't actually green at all.  My cute little plant pot came wrapped in 1 layer of cardboard (not so bad, I'll reuse the box for sorting colored bag strips and when it's worn out I can recycle it) and 2 layers of *gasp* styrofoam.  Yuck!  Styrofoam has NO place in a green product.  I can't recycle it, I can't burn it, it doesn't compost.  It's NOT GREEN! 
 
But this company obviously doesn't really believe in being green
If this company was actually green they would have used cardboard made from recyled content for their packaging.  For a comparable price to styrofoam they could have used EcoCradle natural and compostable packaging material or another natural material.
I hope that by sharing this example, you too will become more aware of the packaging used in your purchases, and be aware that there are many unscrupulous companies out there who are trying to take advantage of environmentally minded people and Greenwash their products and services.  Another example of the age old adage "buyer beware!"

Posted by Picasa

AddThis

Share |
Related Posts with Thumbnails